The Effect of Solidification Rate on Morphology Microstructures and Mechanical Properties of 80%Cu-20%Sn Bronze Alloys
I Ketut Gede Sugita*, R. Soekrisno, I Made Miasa and Suyitno
Department of Mechanical and Industrial Engineering, Gadjah Mada University, Yogyakarta, Indonesia.
DOI : http://dx.doi.org/10.13005/msri/070106
Article Publishing History
Article Received on : 10 Mar 2010
Article Accepted on : 17 Apr 2010
Article Published :
Plagiarism Check: No
Article Metrics
ABSTRACT:
The purpose of this study is to investigate the morphology of solidification microstructures 80% Cu-20%Sn on different solidification rate. The commercial pure copper and tin were melted in crucible furnace at temperature 1000oC. The molten metal was casted in permanent moulds which have variation temperature, i.e. 35oC, 200oC, 400oC. The cooling curves of the castings were recorded using a computer aided data acquisition system. The microstructure and mechanical properties of this alloy have been investigated. The results of this research indicate that decreasing the mould temperatures affected on increasing solidification rate that caused to reduce the solidification time. The difference of solidification rate have effected on microstructure morphology. The secondary dendrite arm spacing (SDAS) decreases with increasing solidification rate, the hardness and strength increase correspondingly. The distribution of hardness cast product increased from the center to outside the cast specimens.
KEYWORDS:
Tin bronze; Dendrite; Secondary dendrite arm spacing (SDAS); Cooling rate; Microstructure
Copy the following to cite this article:
Sugita I. K. G, Soekrisno R, Miasa I. M, Suyitno. The Effect of Solidification Rate on Morphology Microstructures and Mechanical Properties of 80%Cu-20%Sn Bronze Alloys. Mat.Sci.Res.India;7(1)
|
Copy the following to cite this URL:
Sugita I. K. G, Soekrisno R, Miasa I. M, Suyitno. The Effect of Solidification Rate on Morphology Microstructures and Mechanical Properties of 80%Cu-20%Sn Bronze Alloys. Mat.Sci.Res.India;7(1). Available from: http://www.materialsciencejournal.org/?p=2220
|
Introduction
Tin bronze, have widely used in many application for a long time, because of their good properties such as; high strength, thermal conductivity, machine ability, corrosion, and wear resistance. These alloys generally used in bearing, bushing, pumps impeller, pistons ring, bell and many automotive component.1
Tin bronze alloys with composition 80%Cu-20% Sn commonly used as many materials of bell.
This alloy has good mechanical and acoustic properties such as, high strength and hardness, stability in room temperature, speed of sound. It is capable of producing long-lasting slowly damping vibrations 2-4
Mechanical and physical of the cast properties depend on the solidification behavior which is dictated by controlling process during solidification. The microstructure that results from solidification can directly affect on the mechanical properties of alloys.5-8 The process of solidification is the change of liquid to solid metal after pouring into the mould, during event in the life cycle of a casting. Temperature of the liquid drops gradually as heat is being lost to the mould surroundings. The heat will be extracted through the mould walls before solidification is complete.
The rate of heat transfer and the solidification time depend on the thermal properties of the mould material, casting process and the size of the casting. Solidification rate is due to gradient temperature between molten metal and mould temperature. A higher cooling rate produces rapid solidification or short solidification time. The solidification time and heat transfer affect the morphology of microstructure forms, such as grain size and dendrite arm spacing.6-7
Although grain size in castings is considered an important parameter, dendrite and secondary arm spacing (SDAS) are the most important metallurgical factor that influences the mechanical properties of cast components.7 Several studies on the effects of solidification microstructures, particularly of dendrite spacing upon mechanical properties have been studied. Solidification studies conducted on several materials such as: lead-free solder,8 cast iron,9 ductile iron,10 lead and tin materials.11
So far, the research on the effect of solidification rate on microstructures and mechanical properties tin bronze not studied yet. This study was carried out to determine the effect of solidification rate on the microstructures and mechanical properties on different mould temperature.
Experimental
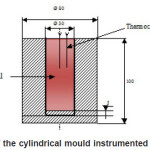
The commercial pure copper (99.99 wt.%) and commercial pure tin (99.99 wt.%) were melted in crucible furnace at temperature 1000oC. The molten metal was casted in steel permanent mould with an internal diameter of 30 mm and height of 85 mm (Fig. 1). Mould temperature variations are: 35oC, 200oC, 400oC. Two K type thermocouples of 1 mm size are used to measure the mould and the casting temperature during solidification.
Figure 1: Schematic of the cylindrical mould instrumented with thermocouples
Set-up of measuring solidification temperatures are shown in Fig. 1. The cooling curves of the casting and variation of temperature at different location in the molten metal are recorded by using computer aided data acquisition system (National Instrument thermocouple system).
The microstructure characteristics of the alloys are evaluated using optical microscope. The specimens for the metallographic investigation were prepared by cutting small (30 mm diameter, 15 mm long) specimens from the castings. Having cut them off, they were polished using silicon carbide abrasive paper of: 240, 400, 600, 800, 1000, 2000, grits, respectively, and then were re-polished perfectly using diamond pasta and etched with 10% HNO3+ 90 % alcohol. These procedures were applied following the standard metallographic techniques
Tensile test was conducted on universal testing machine with a digital 20 KN capacity. The tensile specimens were made according to JIS Z2201. No.7. The specimen was gradually loaded until its fracture. Hardness test was carried out on Vickers type hardness-tester.
Results
Solidification of Alloys
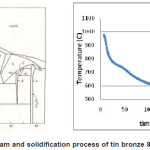
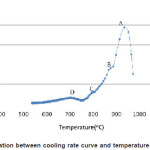
Fig. 2 and Fig. 3 show that solidification curves and correlation between cooling rate curve and temperature solidification tin bronze with composition 80%Cu-20%Sn. The cooling liquid started from pouring temperature (point A) until at the beginning nucleation of dendrites (point B). Molten metal temperature is absorbed directly by the walls that have mould high thermal conductivity.
Figure 2: Phase diagram and solidification process of tin bronze 80%Cu-20% Sn
Figure 3: Correlation between cooling rate curve and temperature solidification
High solidification rate occurs in cooling liquid region as a result of high differences temperature between the molten metal and mould temperature (point A). The specific heat is extracted by the mould until the liquid reaches in the freezing temperature.
Nucleation of dendrite and growth primary α phase were begun at approximate temperature 898oC (point B). The peritectic reaction L+α→β were occurred at near the peritectic temperature 796.3oC (point C). Cooling solid phase was occurred at temperatures below 796.3oC, followed by the lower cooling rate, as a result of the increased mould temperature during solidification
Cooling Curve Analysis
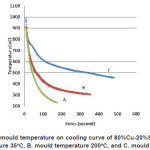
Fig. 4 shows the relationship between the temperature and solidification time on variation mould temperature. The differences mould temperatures have affected the solidification rate that can be shown by different total solidification time. The total solidification time is defined as the time required to remove both the specific heat of liquid and the latent heat of fusion. This is measured from the time of pouring until solidification is complete.6
Figure 4: Effect of mould temperature on cooling curve of 80%Cu-20%Sn bronze alloys (A. mould temperature 35oC, B. mould temperature 200oC, and C. mould temperature 400oC)
The highest solidification rate is obtained on mould temperature (A) 35oC, i.e. 14.35 0C/s followed by mould temperature (B) 200oC and (C) 400oC are 13.1120C/s, 7.725oC/s respectively.
The raising mould temperature affected the solidification process and increased the solidification time. High gradient temperature on liquid cooling region was affected by different temperature between pouring temperature and the mould temperature. The molten metal temperature was absorbed directly on wall mould having high thermal conductivity.
Solidificatition Rate and Microstructure
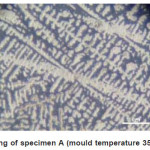
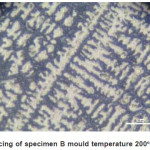
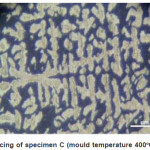
The resullt of metallographic studies show that variation solidification rate have affected microstructure form forming. When the thermal gradient between the mould and the molten metal is very high, rapid solidification was occurred, the solidification time decreases to result in finer secondary dendrite arm spacing (SDAS). Figure 5-Fig.7 shows that variation of preheat mould at constant pouring temperature have affected the microstructure morphology. The microstructures of the specimen as a result of the mould temperature 35 oC, is the finest among mould temperature 200oC and 400oC.
Figure 5: Dendrite arm spacing of specimen A (mould temperature 35oC) (Magnification, 1000x.)
Figure 6: Dendrite arm spacing of specimen B mould temperature 200oC) (Magnification, 1000x)
Figure 7: Dendrite arm spacing of specimen C (mould temperature 400oC) (Magnification, 1000x)
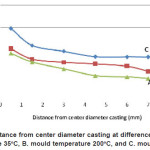
When solidification continue, the mould become hotter and thermal gradient decrease, so solidification rate and time reduce, primary dendrite grow and SDAS increase. Figure 8 shows that the variation of size secondary arm spacing (SDAS) structure along lines on the cross section of specimens C. SDAS decreased from the center diameter to external diameter cast specimens
Figure 8: SDAS vs. distance from center diameter casting at difference mould temperature (A. mould temperature 35oC, B. mould temperature 200oC, and C. mould temperature 400oC)
Tensile and Hardness Measurement Results
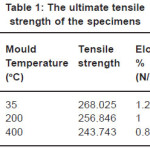
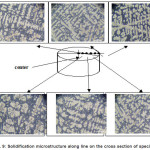
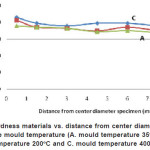
The effect of solidification rate on the mechanical properties such as the tensile and hardness are given on table 1 and Fig 10 respectively. The ultimate strength of casting specimen was increased by decreasing mould temperature. The increased in the strength of the casting specimen was influenced by higher solidification rates leading to microstructure refinement . Hardness distr ibution of the material increased from the center diameter toward the external of diameter specimens. From the observation of microstructure on microscope optic, it revealed that the increasing of the solidification rate affected the decreasing of secondary arm spacing (SDAS). They formed many branches. The size SDAS increased gradually through the center diameter of cast specimen (Fig 9)
Table 1: The ultimate tensile strength of the specimens
Figure 9: Solidification microstructure along line on the cross section of specimen C
Discussion
Solidification rate were affected by variation of gradient temperature between molten metal and mould temperature. When the thermal gradient between the mould and the molten metal is high, the cooling rate increases and solidification time decreases. It can lead to the formation of a more refined microstructure. As solidification proceeds, the mould become hotter, the thermal gradient decreased and solidification time reduced, hence dendrite grow and SDAS increase with less arm13. The DAS increases as the cooling rate decreases because there is less time available for diffusion of the solute6,9,11
Variation of dendrite structure forms were caused by heat absorption starting from outside diameter casting specimens toward the center of the diameter casting specimen. The liquid metal at the center of diameter has enough time to transform from liquid phase to solid phase, primer dendrite were formed. The difference size of SDAS or dendrite structures variation is formed by the effect of different solidification speed a long line from outside to center diameter casting specimen which is shown in Fig 8 and Fig. 9.
The ultimate strength of casting specimen (UTS) increases as rate of cooling increases, showing an inverse relationship with the SDAS.9,10 The increased in the strength of the cast product is due to higher cooling rate leading to grain refinement. The grain refining produces a large number of grains and hence increases in the amount of grain boundaries. The greater grain boundary surface area more effectively block or movement of dislocation and the strength of the casting product is increased6
The hardness distribution of specimens produced with different cooling rates was measured and the results are shown in Fig. 10. It can be seen that the hardness increases with the increasing of cooling rates. The SDAS of the casting specimen also have an effect on the hardness, as shown in. Fig. 8 and Fig. 10. It can be clearly seen that the hardness decreases by increasing SDAS. Similar results have been investigated in Ref.12.
Figure 10: Hardness materials vs. distance from center diameter casting at difference mould temperature (A. mould temperature 35oC, B. mould temperature 200oC and C. mould temperature 400oC)
Conclusion
Based on the result and analysis of data, the casting process on various mould temperature shows that the solidification rate has an effect on SDAS, hardness and tensile strength. It was found that the solidification rate increase as SDAS decreases. The size of SDAS increases from outside diameter into the center diameter of cast specimens. The ultimate tensile strength (UTS) and hardness of material increase as SDAS decreases.
References
- Smith, F., Williams, Structure and Properties of Engineering Alloy, Second Edition, Mc. Grow Hill. Inc. 261 (1993)
- Gupta R.B., Materials Science, Tech India Publication, 239, (2001)
- Hosford F. William, Mechanical Behaviour of Materials, Cambridge University Press, (2005).
- Lisovskii,V.A, Lisovskaya.O.B, Kochetkova,L.P, Favstov, Yu.K, Journal Metal Science and Heat treatment, 49: 232-235 (2007),
CrossRef
- Stefanescu Doru M., Science and Engineering of Casting Solidification, Kluwer Academic/Plenum Publisher, (2002)
- Askeland, D. R., The Science and Engineering of Materials, University of Misouri-Rolla, California, USA. (1984)
- Cambell J., The New Metallurgy of Cast Metals, Second Edition, Butterworth Heinemann (2003)
- Shen Jun, Liu Yong Chang, and Gao Houxiu, Journal of University of Science and Technology Beijing Z3, (2006).
- Seah,K.H, Hemanth,J, Sharma, S.C, Journal of Material Science 33: 23-28 (1998),
CrossRef
- Hemanth Joel, Journal Materials and Design 21: 1-8 (2000).
- Halvaee A., Talebi, A., Journal of Materials Processing Technology, 118: 123-127 (2001).
CrossRef
- Zhang,L,Y, Jiang, Y,H, Ma, Z, Shan, S.F, Jia,Y.Z, Fan, C.Z, Wang, W.K, Journal of Materials Processing Technology, 207: 107– 111 (2008)
CrossRef

This work is licensed under a Creative Commons Attribution 4.0 International License.
 Material Science Research India An International Peer Reviewed Research Journal

