Hydrostatic Stress and Fatigue Crack Growth of Notched Ti6Al4V in Aggressive Media
Sergio Baragetti
Department of Management, Information and Production Engineering, University of Bergamo Viale Marconi 5, 24044 Dalmine (BG), Italy.
Corresponding Author E-mail: sergio.baragetti@unibg.it
DOI : http://dx.doi.org/10.13005/msri/180212
Article Publishing History
Article Received on : 24-Apr-2021
Article Accepted on : 21-May-2021
Article Published : 26 May 2021
Plagiarism Check: Yes
Reviewed by: Dr. Gurumeet Wadhava Second Review by: Dr. Arunabha Mohan Roy
 Final Approval by: Dr. Manoj Gupta
Article Metrics
ABSTRACT:
The behavior of structures, machine or components made of composite materials or light high-performance alloys is still a great concern for applications in which high strength-to-mas-ratio is a fundamental requirement. Procedures to detect flaws of small initial cracks and evaluate fatigue crack growth are nowadays essentials for high performance flying or ground machines (airplanes, automobiles,...). Structural reliability and structural health monitoring are considered in this paper and the surface replica method is deepened. Numerical FEM models were developed to assist the surface replica method analysis of the results. Ti6Al4V alloy was considered. This paper is a short technical communication.
KEYWORDS:
Crack Growth; Corrosion; Replica Method; Ti6Al4V
Copy the following to cite this article:
Baragetti S. Hydrostatic Stress and Fatigue Crack Growth of Notched Ti6Al4V in Aggressive Media. Mat. Sci. Res. India;18(2).
|
Copy the following to cite this URL:
Baragetti S. Hydrostatic Stress and Fatigue Crack Growth of Notched Ti6Al4V in Aggressive Media. Mat. Sci. Res. India;18(2). Available from: https://bit.ly/3uo34Ig
|
Introduction
This paper reports a procedure to valuate crack propagation via the replica method and to calculate the multiaxial stress state influence at the crack tip via FEM numerical models 1-4. Ti6Al4V alloy was considered. Structural reliability and health monitoring are studied in this paper and the surface replica method is deepened. Numerical FEM models were developed to assist the surface replica method analysis of the results. Surely the proposed procedure is not immediately applicable in situ (on flying airplanes or working machines): it is rather a laboratory procedure that can be applied in a restricted and controlled environment. The procedure is suitable for components or machines for which the safe-life approach is needed.
FE fracture mechanics numerical models
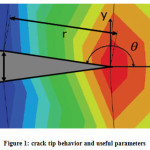
The stress concentration factor can been valuated by means planar numerical models, either plane strain or with stresse lying in the plane. Lee 2 and Anderson 3 proposed equation (1) for the evaluation of the stress concentration factor (Figure 1):

Figure 1: crack tip behavior and useful parameters
with u CTOD (crack opening displ.);

for stresses lying on the plane.
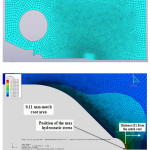
Elastic perfectly-plastic of elastic plastic-hardening numerical finite elements models should be developed. Accuracy of the numerical grid refinement at the stress concentration area is fundamental, along with the simulation of the non-linear behaviour of the material.
Figure 2: Examples of the grid accuracy at the notched area.
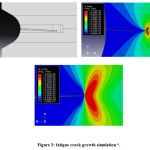
Fatigue crack propagation can be monitored via the replica method and modelled via numerical finite element modelling. The use of an optical or a stereoscopic microscope can help in observing crack propagation detected by using the replica method.
Figure 3: Fatigue crack growth simulation 4.
Defect propagation is allowed only when the limit stress intensity factor range ΔK1c is reached. Many literature models can be used, as reported in equations (2-4). All the cited equations were developed from theories in which a linear elastic behavior of the material is taken into account.

Materail parameters useful for equations (2-4) can be found in the literature for many materials. Surely for steel, Titanium and Aluminum alloys.
Experimental validation of the results: the surface replica method.
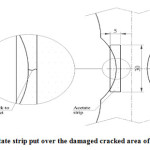
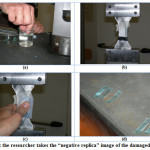
The behavior at the defect gage section can be monitored by using a certain kind of “negative image” of the damaged surface. Researchers can use acetate strips having small thickness (in the range 0,1-0,2 mm). Acetate strips have to be immerged in acetone for a few seconds and then accurately pressed on the damaged surface (Figures 4 and 5).
Figure 4: Acetate strip put over the damaged cracked area of the specimen.
Figure 5: The researcher takes the “negative replica” image of the damaged surface.
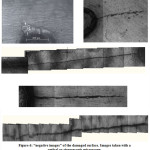
Figure 6: “Negative Images” of the damaged surface. Images were taken with an optical or stereoscopic microscope.
Conclusions
This paper is a short technical communication in which a procedure to valuate crack propagation via the replica method and to calculate the multiaxial stress state influence at the crack tip via FEM numerical models was reported. Ti6Al4V alloy was considered. Structural reliability and health monitoring were studied in this paper and the surface replica method is deepened. Numerical FEM models were developed to assist the surface replica method analysis of the results. The procedure is suitable for components or machines for which the safe-life approach is needed. Laboratory environments id need to apply the procedure.
Acknowledgement
The author would like to thanks reviewers for their helpful comments and constructive suggestions that greatly improved the paper.
Conflict of Interest
The authors have no conflicts of interest to disclose.
Funding Source
This research received no specific grant from any funding agency.
References
- Baragetti, S., Villa, F., 2015. “Quasi-Static Behavior of Notched Ti-6Al-4V Specimens in Water-Methanol Solution”. Corrosion Reviews, 33, 6.
CrossRef
- Anderson, T.L., 2005. Fracture Mechanics, third ed., Taylor & Francis, Boca Raton.
CrossRef
- Baragetti, S., Villa, F.; 2015. High-Strength Titanium Alloys Under Different Stress Gradients. The Journal of The Minerals, Metals & Materials Society (JOM), 67, 5.
CrossRef
- Baragetti, S., Villa, F., 2014. SCC and corrosion fatigue characterization of a Ti-6Al-4V alloy in a corrosive environment – experiments and numerical models. Frat. edIntegritàStrutt, vol. 8, no. 30, pp. 84–9
CrossRef
- Anderson, T.L., 2005. Fracture Mechanics, third ed., Taylor & Francis, Boca Raton.
CrossRef
- Beden, S.M., Abdullah, S., Ariffin, A.K., 2009. Review of Fatigue Crack Propagation Models for Metallic Components, Eur.J. Sci. Res., 3, 364–397.
- Kato, M., Deng, G., Inoue, K., Takatsu, N., 1993. Evaluation of the Strength of Carburized Spur Gear Teeth Based on Fracture Mechanics, JSME Int. J., Ser. C, 36(2), 233–240.
CrossRef
- Beden, S.M., Abdullah, S., Ariffin, A.K., 2009. Review of Fatigue Crack Propagation Models for Metallic Components, Eur.J. Sci. Res., 3, 364–397.
Views: 482
 This work is licensed under a Creative Commons Attribution 4.0 International License.


 Material Science Research India An International Peer Reviewed Research Journal


